简介
RecyclerView在24.2.0版本中新增了SnapHelper这个辅助类,用于辅助RecyclerView在滚动结束时将Item对齐到某个位置。特别是列表横向滑动时,很多时候不会让列表滑到任意位置,而是会有一定的规则限制,这时候就可以通过SnapHelper来定义对齐规则了。
SnapHelper是一个抽象类,官方提供了一个LinearSnapHelper的子类,可以让RecyclerView滚动停止时相应的Item停留中间位置。25.1.0版本中官方又提供了一个PagerSnapHelper的子类,可以使RecyclerView像ViewPager一样的效果,一次只能滑一页,而且居中显示。
这两个子类使用方式也很简单,只需要创建对象之后调用attachToRecyclerView()附着到对应的RecyclerView对象上就可以了。
new LinearSnapHelper().attachToRecyclerView(mRecyclerView);
//或者
new PagerSnapHelper().attachToRecyclerView(mRecyclerView);
原理剖析
Fling操作
首先来了解一个概念,手指在屏幕上滑动RecyclerView然后松手,RecyclerView中的内容会顺着惯性继续往手指滑动的方向继续滚动直到停止,这个过程叫做Fling。Fling操作从手指离开屏幕瞬间被触发,在滚动停止时结束。
三个抽象方法
SnapHelper是一个抽象类,它有三个抽象方法:
public abstract int findTargetSnapPosition(LayoutManager layoutManager, int velocityX, int velocityY)
该方法会根据触发Fling操作的速率(参数velocityX和参数velocityY)来找到RecyclerView需要滚动到哪个位置,该位置对应的ItemView就是那个需要进行对齐的列表项。我们把这个位置称为targetSnapPosition,对应的View称为targetSnapView。如果找不到targetSnapPosition,就返回RecyclerView.NO_POSITION。
public abstract View findSnapView(LayoutManager layoutManager)
该方法会找到当前layoutManager上最接近对齐位置的那个view,该view称为SanpView,对应的position称为SnapPosition。如果返回null,就表示没有需要对齐的View,也就不会做滚动对齐调整。
public abstract int[] calculateDistanceToFinalSnap(@NonNull LayoutManager layoutManager, @NonNull View targetView);
这个方法会计算第二个参数对应的ItemView当前的坐标与需要对齐的坐标之间的距离。该方法返回一个大小为2的int数组,分别对应x轴和y轴方向上的距离。
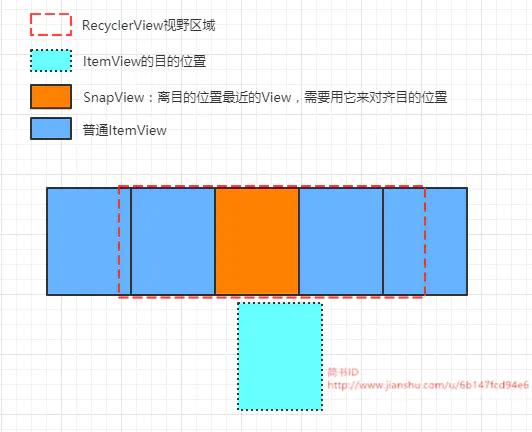
attachToRecyclerView()
现在来看attachToRecyclerView()这个方法,SnapHelper正是通过该方法附着到RecyclerView上,从而实现辅助RecyclerView滚动对齐操作。源码如下:
   public void attachToRecyclerView(@Nullable RecyclerView recyclerView)
            throws IllegalStateException {
      //如果SnapHelper之前已经附着到此RecyclerView上,不用进行任何操作
        if (mRecyclerView == recyclerView) {
            return;
        }
      //如果SnapHelper之前附着的RecyclerView和现在的不一致,清理掉之前RecyclerView的回调
        if (mRecyclerView != null) {
            destroyCallbacks();
        }
      //更新RecyclerView对象引用
        mRecyclerView = recyclerView;
        if (mRecyclerView != null) {
          //设置当前RecyclerView对象的回调
            setupCallbacks();
          //创建一个Scroller对象,用于辅助计算fling的总距离,后面会涉及到
            mGravityScroller = new Scroller(mRecyclerView.getContext(),
                    new DecelerateInterpolator());
          //调用snapToTargetExistingView()方法以实现对SnapView的对齐滚动处理
            snapToTargetExistingView();
        }
    }
可以看到,在attachToRecyclerView()方法中会清掉SnapHelper之前保存的RecyclerView对象的回调(如果有的话),对新设置进来的RecyclerView对象设置回调,然后初始化一个Scroller对象,最后调用snapToTargetExistingView()方法对SnapView进行对齐调整。
snapToTargetExistingView()
该方法的作用是对SnapView进行滚动调整,以使得SnapView达到对齐效果。源码如下:
    void snapToTargetExistingView() {
        if (mRecyclerView == null) {
            return;
        }
        LayoutManager layoutManager = mRecyclerView.getLayoutManager();
        if (layoutManager == null) {
            return;
        }
      //找出SnapView
        View snapView = findSnapView(layoutManager);
        if (snapView == null) {
            return;
        }
      //计算出SnapView需要滚动的距离
        int[] snapDistance = calculateDistanceToFinalSnap(layoutManager, snapView);
      //如果需要滚动的距离不是为0,就调用smoothScrollBy()使RecyclerView滚动相应的距离
        if (snapDistance[0] != 0 || snapDistance[1] != 0) {
            mRecyclerView.smoothScrollBy(snapDistance[0], snapDistance[1]);
        }
    }
可以看到,snapToTargetExistingView()方法就是先找到SnapView,然后计算SnapView当前坐标到目的坐标之间的距离,然后调用RecyclerView.smoothScrollBy()方法实现对RecyclerView内容的平滑滚动,从而将SnapView移到目标位置,达到对齐效果。RecyclerView.smoothScrollBy()这个方法的实现原理这里就不展开了 ,它的作用就是根据参数平滑滚动RecyclerView的中的ItemView相应的距离。
setupCallbacks()和destroyCallbacks()
再看下SnapHelper对RecyclerView设置了哪些回调:
    private void setupCallbacks() throws IllegalStateException {
        if (mRecyclerView.getOnFlingListener() != null) {
            throw new IllegalStateException("An instance of OnFlingListener already set.");
        }
        mRecyclerView.addOnScrollListener(mScrollListener);
        mRecyclerView.setOnFlingListener(this);
    }

    private void destroyCallbacks() {
        mRecyclerView.removeOnScrollListener(mScrollListener);
        mRecyclerView.setOnFlingListener(null);
    }
可以看出RecyclerView设置的回调有两个:一个是OnScrollListener对象mScrollListener.还有一个是OnFlingListener对象。由于SnapHelper实现了OnFlingListener接口,所以这个对象就是SnapHelper自身了.
先看下mScrollListener这个变量在怎样实现的.
    private final RecyclerView.OnScrollListener mScrollListener =
            new RecyclerView.OnScrollListener() {
                boolean mScrolled = false;
                @Override
                public void onScrollStateChanged(RecyclerView recyclerView, int newState) {
                    super.onScrollStateChanged(recyclerView, newState);
                  //mScrolled为true表示之前进行过滚动.
                  //newState为SCROLL_STATE_IDLE状态表示滚动结束停下来
                    if (newState == RecyclerView.SCROLL_STATE_IDLE && mScrolled) {
                        mScrolled = false;
                        snapToTargetExistingView();
                    }
                }

                @Override
                public void onScrolled(RecyclerView recyclerView, int dx, int dy) {
                    if (dx != 0 || dy != 0) {
                        mScrolled = true;
                    }
                }
            };
该滚动监听器的实现很简单,只是在正常滚动停止的时候调用了snapToTargetExistingView()方法对targetView进行滚动调整,以确保停止的位置是在对应的坐标上,这就是RecyclerView添加该OnScrollListener的目的。
除了OnScrollListener这个监听器,还对RecyclerView还设置了OnFlingListener这个监听器,而这个监听器就是SnapHelper自身。因为SnapHelper实现了RecyclerView.OnFlingListener接口。我们先来看看RecyclerView.OnFlingListener这个接口。
    public static abstract class OnFlingListener {
            /**
         * Override this to handle a fling given the velocities in both x and y directions.
         * Note that this method will only be called if the associated {@link LayoutManager}
         * supports scrolling and the fling is not handled by nested scrolls first.
         *
         * @param velocityX the fling velocity on the X axis
         * @param velocityY the fling velocity on the Y axis
         *
         * @return true if the fling washandled, false otherwise.
         */
        public abstract boolean onFling(int velocityX, int velocityY);
    }
这个接口中就只有一个onFling()方法,该方法会在RecyclerView开始做fling操作时被调用。我们来看看SnapHelper怎么实现onFling()方法:
    @Override
    public boolean onFling(int velocityX, int velocityY) {
        LayoutManager layoutManager = mRecyclerView.getLayoutManager();
        if (layoutManager == null) {
            return false;
        }
        RecyclerView.Adapter adapter = mRecyclerView.getAdapter();
        if (adapter == null) {
            return false;
        }
      //获取RecyclerView要进行fling操作需要的最小速率,
      //只有超过该速率,ItemView才会有足够的动力在手指离开屏幕时继续滚动下去
        int minFlingVelocity = mRecyclerView.getMinFlingVelocity();
      //这里会调用snapFromFling()这个方法,就是通过该方法实现平滑滚动并使得在滚动停止时itemView对齐到目的坐标位置
        return (Math.abs(velocityY) > minFlingVelocity || Math.abs(velocityX) > minFlingVelocity)
                && snapFromFling(layoutManager, velocityX, velocityY);
    }
注释解释得很清楚。看下snapFromFling()怎么操作的:
    private boolean snapFromFling(@NonNull LayoutManager layoutManager, int velocityX,
            int velocityY) {
      //layoutManager必须实现ScrollVectorProvider接口才能继续往下操作
        if (!(layoutManager instanceof ScrollVectorProvider)) {
            return false;
        }

      //创建SmoothScroller对象,这个东西是一个平滑滚动器,用于对ItemView进行平滑滚动操作
        RecyclerView.SmoothScroller smoothScroller = createSnapScroller(layoutManager);
        if (smoothScroller == null) {
            return false;
        }

      //通过findTargetSnapPosition()方法,以layoutManager和速率作为参数,找到targetSnapPosition
        int targetPosition = findTargetSnapPosition(layoutManager, velocityX, velocityY);
        if (targetPosition == RecyclerView.NO_POSITION) {
            return false;
        }
        //通过setTargetPosition()方法设置滚动器的滚动目标位置
        smoothScroller.setTargetPosition(targetPosition);
        //利用layoutManager启动平滑滚动器,开始滚动到目标位置
        layoutManager.startSmoothScroll(smoothScroller);
        return true;
    }
可以看到,snapFromFling()方法会先判断layoutManager是否实现了ScrollVectorProvider接口,如果没有实现该接口就不允许通过该方法做滚动操作。那为啥一定要实现该接口呢?待会再来解释。接下来就去创建平滑滚动器SmoothScroller的一个实例,layoutManager可以通过该平滑滚动器来进行滚动操作。SmoothScroller需要设置一个滚动的目标位置,我们将通过findTargetSnapPosition()方法来计算得到的targetSnapPosition给它,告诉滚动器要滚到这个位置,然后就启动SmoothScroller进行滚动操作。
但是这里有一点需要注意一下,默认情况下通过setTargetPosition()方法设置的SmoothScroller只能将对应位置的ItemView滚动到与RecyclerView的边界对齐,那怎么实现将该ItemView滚动到我们需要对齐的目标位置呢?就得对SmoothScroller进行一下处理了。
看下平滑滚动器RecyclerView.SmoothScroller,这个东西是通过createSnapScroller()方法创建得到的:
    @Nullable
    protected LinearSmoothScroller createSnapScroller(LayoutManager layoutManager) {
      //同样,这里也是先判断layoutManager是否实现了ScrollVectorProvider这个接口,
      //没有实现该接口就不创建SmoothScroller
        if (!(layoutManager instanceof ScrollVectorProvider)) {
            return null;
        }
      //这里创建一个LinearSmoothScroller对象,然后返回给调用函数,
      //也就是说,最终创建出来的平滑滚动器就是这个LinearSmoothScroller
        return new LinearSmoothScroller(mRecyclerView.getContext()) {
          //该方法会在targetSnapView被layout出来的时候调用。
          //这个方法有三个参数:
          //第一个参数targetView,就是本文所讲的targetSnapView
          //第二个参数RecyclerView.State这里没用到,先不管它
          //第三个参数Action,这个是什么东西呢?它是SmoothScroller的一个静态内部类,
          //保存着SmoothScroller在平滑滚动过程中一些信息,比如滚动时间,滚动距离,差值器等
            @Override
            protected void onTargetFound(View targetView, RecyclerView.State state, Action action) {
             //calculateDistanceToFinalSnap()方法上面解释过,
             //得到targetSnapView当前坐标到目的坐标之间的距离
                int[] snapDistances = calculateDistanceToFinalSnap(mRecyclerView.getLayoutManager(),
                        targetView);
                final int dx = snapDistances[0];
                final int dy = snapDistances[1];
              //通过calculateTimeForDeceleration()方法得到做减速滚动所需的时间
                final int time = calculateTimeForDeceleration(Math.max(Math.abs(dx), Math.abs(dy)));
                if (time > 0) {
                  //调用Action的update()方法,更新SmoothScroller的滚动速率,使其减速滚动到停止
                  //这里的这样做的效果是,此SmoothScroller用time这么长的时间以mDecelerateInterpolator这个差值器的滚动变化率滚动dx或者dy这么长的距离
                    action.update(dx, dy, time, mDecelerateInterpolator);
                }
            }

          //该方法是计算滚动速率的,返回值代表滚动速率,该值会影响刚刚上面提到的
          //calculateTimeForDeceleration()的方法的返回返回值,
          //MILLISECONDS_PER_INCH的值是100,也就是说该方法的返回值代表着每dpi的距离要滚动100毫秒
            @Override
            protected float calculateSpeedPerPixel(DisplayMetrics displayMetrics) {
                return MILLISECONDS_PER_INCH / displayMetrics.densityDpi;
            }
        };
    }
通过以上的分析可以看到,createSnapScroller()创建的是一个LinearSmoothScroller,并且在创建该LinearSmoothScroller的时候主要考虑两个方面:
- 第一个是滚动速率,由
calculateSpeedPerPixel()方法决定; - 第二个是在滚动过程中,targetView即将要进入到视野时,将匀速滚动变换为减速滚动,然后一直滚动目的坐标位置,使滚动效果更真实,这是由
onTargetFound()方法决定。
刚刚不是留了一个疑问么?就是正常模式下SmoothScroller通过setTargetPosition()方法设置的ItemView只能滚动到与RecyclerView边缘对齐,而解决这个局限的处理方式就是在SmoothScroller的onTargetFound()方法中了。onTargetFound()方法会在SmoothScroller滚动过程中,targetSnapView被layout出来时调用。而这个时候利用calculateDistanceToFinalSnap()方法得到targetSnapView当前坐标与目的坐标之间的距离,然后通过Action.update()方法改变当前SmoothScroller的状态,让SmoothScroller根据新的滚动距离、新的滚动时间、新的滚动差值器来滚动,这样既能将targetSnapView滚动到目的坐标位置,又能实现减速滚动,使得滚动效果更真实。
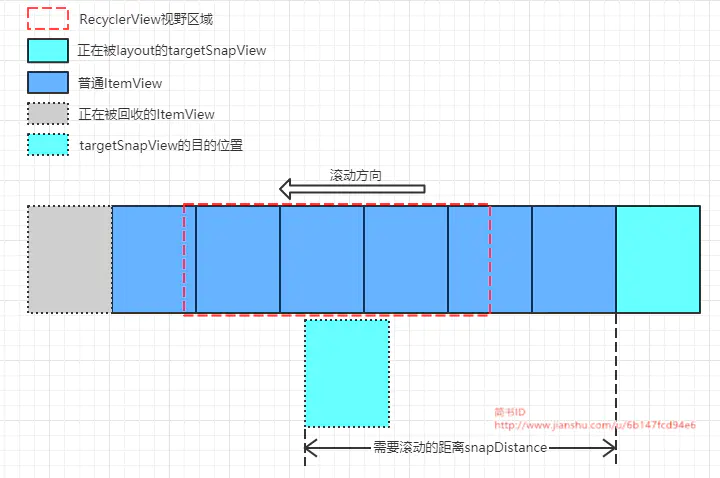
从图中可以看到,很多时候targetSnapView被layout的时候(onTargetFound()方法被调用)并不是紧挨着界面上的Item,而是会有一定的提前,这是由于RecyclerView为了优化性能,提高流畅度,在滑动滚动的时候会有一个预加载的过程,提前将Item给layout出来了,这个知识点涉及到的内容很多,这里做个理解就可以了,不详细细展开了,以后有时间会专门讲下RecyclerView的相关原理机制。
到了这里,整理一下前面的思路:SnapHelper实现了OnFlingListener这个接口,该接口中的onFling()方法会在RecyclerView触发Fling操作时调用。在onFling()方法中判断当前方向上的速率是否足够做滚动操作,如果速率足够大就调用snapFromFling()方法实现滚动相关的逻辑。在snapFromFling()方法中会创建一个SmoothScroller,并且根据速率计算出滚动停止时的位置,将该位置设置给SmoothScroller并启动滚动。而滚动的操作都是由SmoothScroller全权负责,它可以控制Item的滚动速度(刚开始是匀速),并且在滚动到targetSnapView被layout时变换滚动速度(转换成减速),以让滚动效果更加真实。
所以,SnapHelper辅助RecyclerView实现滚动对齐就是通过给RecyclerView设置OnScrollerListenerh和OnFlingListener这两个监听器实现的。
LinearSnapHelper
SnapHelper辅助RecyclerView滚动对齐的框架已经搭好了,子类只要根据对齐方式实现那三个抽象方法就可以了。以LinearSnapHelper为例,看它到底怎么实现SnapHelper的三个抽象方法,从而让ItemView滚动居中对齐:
calculateDistanceToFinalSnap()
    @Override
    public int[] calculateDistanceToFinalSnap(
            @NonNull RecyclerView.LayoutManager layoutManager, @NonNull View targetView) {
        int[] out = new int[2];
      //水平方向滚动,则计算水平方向需要滚动的距离,否则水平方向的滚动距离为0
        if (layoutManager.canScrollHorizontally()) {
            out[0] = distanceToCenter(layoutManager, targetView,
                    getHorizontalHelper(layoutManager));
        } else {
            out[0] = 0;
        }

      //竖直方向滚动,则计算竖直方向需要滚动的距离,否则水平方向的滚动距离为0
        if (layoutManager.canScrollVertically()) {
            out[1] = distanceToCenter(layoutManager, targetView,
                    getVerticalHelper(layoutManager));
        } else {
            out[1] = 0;
        }
        return out;
    }
该方法是返回第二个传参对应的view到RecyclerView中间位置的距离,可以支持水平方向滚动和竖直方向滚动两个方向的计算。最主要的计算距离的这个方法distanceToCenter():
    private int distanceToCenter(@NonNull RecyclerView.LayoutManager layoutManager,
            @NonNull View targetView, OrientationHelper helper) {
      //找到targetView的中心坐标
        final int childCenter = helper.getDecoratedStart(targetView) +
                (helper.getDecoratedMeasurement(targetView) / 2);
        final int containerCenter;
      //找到容器(RecyclerView)的中心坐标
        if (layoutManager.getClipToPadding()) {
            containerCenter = helper.getStartAfterPadding() + helper.getTotalSpace() / 2;
        } else {
            containerCenter = helper.getEnd() / 2;
        }
      //两个中心坐标的差值就是targetView需要滚动的距离
        return childCenter - containerCenter;
    }
可以看到,就是计算对应的view的中心坐标到RecyclerView中心坐标之间的距离,该距离就是此view需要滚动的距离。
findSnapView()
    @Override
    public View findSnapView(RecyclerView.LayoutManager layoutManager) {
        if (layoutManager.canScrollVertically()) {
            return findCenterView(layoutManager, getVerticalHelper(layoutManager));
        } else if (layoutManager.canScrollHorizontally()) {
            return findCenterView(layoutManager, getHorizontalHelper(layoutManager));
        }
        return null;
    }
寻找SnapView,这里的目的坐标就是RecyclerView中间位置坐标,可以看到会根据layoutManager的布局方式(水平布局方式或者竖向布局方式)区分计算,但最终都是通过findCenterView()方法来找snapView的。
    private View findCenterView(RecyclerView.LayoutManager layoutManager,
            OrientationHelper helper) {
        int childCount = layoutManager.getChildCount();
        if (childCount == 0) {
            return null;
        }

        View closestChild = null;
      //找到RecyclerView的中心坐标
        final int center;
        if (layoutManager.getClipToPadding()) {
            center = helper.getStartAfterPadding() + helper.getTotalSpace() / 2;
        } else {
            center = helper.getEnd() / 2;
        }
        int absClosest = Integer.MAX_VALUE;

      //遍历当前layoutManager中所有的ItemView
        for (int i = 0; i < childCount; i++) {
            final View child = layoutManager.getChildAt(i);
          //ItemView的中心坐标
            int childCenter = helper.getDecoratedStart(child) +
                    (helper.getDecoratedMeasurement(child) / 2);
          //计算此ItemView与RecyclerView中心坐标的距离
            int absDistance = Math.abs(childCenter - center);

            //对比每个ItemView距离到RecyclerView中心点的距离,找到那个最靠近中心的ItemView然后返回
            if (absDistance < absClosest) {
                absClosest = absDistance;
                closestChild = child;
            }
        }
        return closestChild;
    }
注释解释得很清楚,就不重复了。
findTargetSnapPosition()
@Override
    public int findTargetSnapPosition(RecyclerView.LayoutManager layoutManager, int velocityX,
            int velocityY) {
      //判断layoutManager是否实现了RecyclerView.SmoothScroller.ScrollVectorProvider这个接口
        if (!(layoutManager instanceof RecyclerView.SmoothScroller.ScrollVectorProvider)) {
            return RecyclerView.NO_POSITION;
        }

        final int itemCount = layoutManager.getItemCount();
        if (itemCount == 0) {
            return RecyclerView.NO_POSITION;
        }

      //找到snapView
        final View currentView = findSnapView(layoutManager);
        if (currentView == null) {
            return RecyclerView.NO_POSITION;
        }

        final int currentPosition = layoutManager.getPosition(currentView);
        if (currentPosition == RecyclerView.NO_POSITION) {
            return RecyclerView.NO_POSITION;
        }

        RecyclerView.SmoothScroller.ScrollVectorProvider vectorProvider =
                (RecyclerView.SmoothScroller.ScrollVectorProvider) layoutManager;
        // 通过ScrollVectorProvider接口中的computeScrollVectorForPosition()方法
        // 来确定layoutManager的布局方向
        PointF vectorForEnd = vectorProvider.computeScrollVectorForPosition(itemCount - 1);
        if (vectorForEnd == null) {
            return RecyclerView.NO_POSITION;
        }

        int vDeltaJump, hDeltaJump;
        if (layoutManager.canScrollHorizontally()) {
          //layoutManager是横向布局,并且内容超出一屏,canScrollHorizontally()才返回true
          //估算fling结束时相对于当前snapView位置的横向位置偏移量
            hDeltaJump = estimateNextPositionDiffForFling(layoutManager,
                    getHorizontalHelper(layoutManager), velocityX, 0);
          //vectorForEnd.x < 0代表layoutManager是反向布局的,就把偏移量取反
            if (vectorForEnd.x < 0) {
                hDeltaJump = -hDeltaJump;
            }
        } else {
          //不能横向滚动,横向位置偏移量当然就为0
            hDeltaJump = 0;
        }

      //竖向的原理同上
        if (layoutManager.canScrollVertically()) {
            vDeltaJump = estimateNextPositionDiffForFling(layoutManager,
                    getVerticalHelper(layoutManager), 0, velocityY);
            if (vectorForEnd.y < 0) {
                vDeltaJump = -vDeltaJump;
            }
        } else {
            vDeltaJump = 0;
        }

      //根据layoutManager的横竖向布局方式,最终横向位置偏移量和竖向位置偏移量二选一,作为fling的位置偏移量
        int deltaJump = layoutManager.canScrollVertically() ? vDeltaJump : hDeltaJump;
        if (deltaJump == 0) {
            return RecyclerView.NO_POSITION;
        }
        //当前位置加上偏移位置,就得到fling结束时的位置,这个位置就是targetPosition
        int targetPos = currentPosition + deltaJump;
        if (targetPos < 0) {
            targetPos = 0;
        }
        if (targetPos >= itemCount) {
            targetPos = itemCount - 1;
        }
        return targetPos;
    }
RecyclerView的layoutManager很灵活,有两种布局方式(横向布局和纵向布局),每种布局方式有两种布局方向(正向布局和反向布局)。这个方法在计算targetPosition的时候把布局方式和布局方向都考虑进去了。布局方式可以通过layoutManager.canScrollHorizontally()/layoutManager.canScrollVertically()来判断,布局方向就通过RecyclerView.SmoothScroller.ScrollVectorProvider这个接口中的computeScrollVectorForPosition()方法来判断。
所以SnapHelper为了适配layoutManager的各种情况,特意要求**只有实现了RecyclerView.SmoothScroller.ScrollVectorProvider接口的layoutManager才能使用SnapHelper进行辅助滚动对齐。**官方提供的LinearLayoutManager、GridLayoutManager和StaggeredGridLayoutManager都实现了这个接口,所以都支持SnapHelper。
这几个方法在计算位置的时候用的是OrientationHelper这个工具类,它是LayoutManager用于测量child的一个辅助类,可以根据Layoutmanager的布局方式和布局方向来计算得到ItemView的大小位置等信息。
从源码中可以看到findTargetSnapPosition()会先找到fling操作被触发时界面上的snapView(因为findTargetSnapPosition()方法是在onFling()方法中被调用的),得到对应的snapPosition,然后通过estimateNextPositionDiffForFling()方法估算位置偏移量,snapPosition加上位置偏移量就得到最终滚动结束时的位置,也就是targetSnapPosition。
这里有一个点需要注意一下,就是在找targetSnapPosition之前是需要先找一个参考位置的,该参考位置就是snapPosition了。这是因为当前界面上不同的ItemView位置相差比较大,用snapPosition作参考位置,会使得参考位置加上位置偏移量得到的targetSnapPosition最接近目的坐标位置,从而让后续的坐标对齐调整更加自然。
看下estimateNextPositionDiffForFling()方法怎么估算位置偏移量的:
    private int estimateNextPositionDiffForFling(RecyclerView.LayoutManager layoutManager,
            OrientationHelper helper, int velocityX, int velocityY) {
      //计算滚动的总距离,这个距离受到触发fling时的速度的影响
        int[] distances = calculateScrollDistance(velocityX, velocityY);
      //计算每个ItemView的长度
        float distancePerChild = computeDistancePerChild(layoutManager, helper);
        if (distancePerChild <= 0) {
            return 0;
        }
      //这里其实就是根据是横向布局还是纵向布局,来取对应布局方向上的滚动距离
        int distance =
                Math.abs(distances[0]) > Math.abs(distances[1]) ? distances[0] : distances[1];
      //distance的正负值符号表示滚动方向,数值表示滚动距离。横向布局方式,内容从右往左滚动为正;竖向布局方式,内容从下往上滚动为正
      // 滚动距离/item的长度=滚动item的个数,这里取计算结果的整数部分
      if (distance > 0) {
            return (int) Math.floor(distance / distancePerChild);
        } else {
            return (int) Math.ceil(distance / distancePerChild);
        }
    }
可以看到就是用滚动总距离除以itemview的长度,从而估算得到需要滚动的item数量,此数值就是位置偏移量。而滚动距离是通过SnapHelper的calculateScrollDistance()方法得到的,ItemView的长度是通过computeDistancePerChild()方法计算出来。
看下这两个方法:
private float computeDistancePerChild(RecyclerView.LayoutManager layoutManager,
                                          OrientationHelper helper) {
        View minPosView = null;
        View maxPosView = null;
        int minPos = Integer.MAX_VALUE;
        int maxPos = Integer.MIN_VALUE;
        int childCount = layoutManager.getChildCount();
        if (childCount == 0) {
            return INVALID_DISTANCE;
        }

        //循环遍历layoutManager的itemView,得到最小position和最大position,以及对应的view
        for (int i = 0; i < childCount; i++) {
            View child = layoutManager.getChildAt(i);
            final int pos = layoutManager.getPosition(child);
            if (pos == RecyclerView.NO_POSITION) {
                continue;
            }
            if (pos < minPos) {
                minPos = pos;
                minPosView = child;
            }
            if (pos > maxPos) {
                maxPos = pos;
                maxPosView = child;
            }
        }
        if (minPosView == null || maxPosView == null) {
            return INVALID_DISTANCE;
        }
        //最小位置和最大位置肯定就是分布在layoutManager的两端,但是无法直接确定哪个在起点哪个在终点(因为有正反向布局)
        //所以取两者中起点坐标小的那个作为起点坐标
        //终点坐标的取值一样的道理
        int start = Math.min(helper.getDecoratedStart(minPosView),
                helper.getDecoratedStart(maxPosView));
        int end = Math.max(helper.getDecoratedEnd(minPosView),
                helper.getDecoratedEnd(maxPosView));
        //终点坐标减去起点坐标得到这些itemview的总长度
        int distance = end - start;
        if (distance == 0) {
            return INVALID_DISTANCE;
        }
        // 总长度 / itemview个数 = itemview平均长度
        return 1f * distance / ((maxPos - minPos) + 1);
    }
可以发现computeDistancePerChild()方法也用总长度除以ItemView个数的方式来得到ItemView平均长度,并且也支持了layoutManager不同的布局方式和布局方向。
    public int[] calculateScrollDistance(int velocityX, int velocityY) {
        int[] outDist = new int[2];
        //mGravityScroller是一个Scroller,通过fling()方法模拟fling操作,通过将起点位置都置为0,此时得到的终点位置就是滚动的距离
        mGravityScroller.fling(0, 0, velocityX, velocityY,
                Integer.MIN_VALUE, Integer.MAX_VALUE, Integer.MIN_VALUE, Integer.MAX_VALUE);
        outDist[0] = mGravityScroller.getFinalX();
        outDist[1] = mGravityScroller.getFinalY();
        return outDist;
    }
calculateScrollDistance()是SnapHelper中的方法,它使用到的mGravityScroller是一个在attachToRecyclerView()中初始化的Scroller对象,通过Scroller.fling()方法模拟fling操作,将fling的起点位置为设置为0,此时得到的终点位置就是fling的距离。这个距离会有正负符号之分,表示滚动的方向。
现在明白了吧,LinearSnapHelper的主要功能就是通过实现SnapHelper的三个抽象方法,从而实现辅助RecyclerView滚动Item对齐中心位置。
自定义SnapHelper
经过了以上分析,了解了SnapHelper的工作原理之后,自定义SnapHelper也就更加自如了。现在来看下Google Play主界面的效果。

可以看到该效果是一个类似Gallery的横向列表滑动控件,很明显可以用RecyclerView来实现,而滚动后的ItemView是对齐RecyclerView的左边缘位置,这种对齐效果当仍不让就使用了SnapHelper来实现了。这里就主要讲下这个SnapHelper怎么实现的。
创建一个GallerySnapHelper继承SnapHelper实现它的三个抽象方法:
calculateDistanceToFinalSnap():计算SnapView当前位置与目标位置的距离
        @Override
        public int[] calculateDistanceToFinalSnap(@NonNull RecyclerView.LayoutManager layoutManager, @NonNull View targetView) {
            int[] out = new int[2];
            if (layoutManager.canScrollHorizontally()) {
                out[0] = distanceToStart(targetView, getHorizontalHelper(layoutManager));
            } else {
                out[0] = 0;
            }
            return out;
        }
      //targetView的start坐标与RecyclerView的paddingStart之间的差值
      //就是需要滚动调整的距离
        private int distanceToStart(View targetView, OrientationHelper helper) {
            return helper.getDecoratedStart(targetView) - helper.getStartAfterPadding();
        }
findSnapView():找到当前时刻的SnapView。
      @Override
          public View findSnapView(RecyclerView.LayoutManager layoutManager) {
              return findStartView(layoutManager, getHorizontalHelper(layoutManager));
          }

      private View findStartView(RecyclerView.LayoutManager layoutManager, OrientationHelper helper) {
            if (layoutManager instanceof LinearLayoutManager) {
              //找出第一个可见的ItemView的位置
                int firstChildPosition = ((LinearLayoutManager) layoutManager).findFirstVisibleItemPosition();
                if (firstChildPosition == RecyclerView.NO_POSITION) {
                    return null;
                }
              //找到最后一个完全显示的ItemView,如果该ItemView是列表中的最后一个
                  //就说明列表已经滑动最后了,这时候就不应该根据第一个ItemView来对齐了
                  //要不然由于需要跟第一个ItemView对齐最后一个ItemView可能就一直无法完全显示,
                  //所以这时候直接返回null表示不需要对齐
                if (((LinearLayoutManager) layoutManager).findLastCompletelyVisibleItemPosition() == layoutManager.getItemCount() - 1) {
                    return null;
                }

                View firstChildView = layoutManager.findViewByPosition(firstChildPosition);
              //如果第一个ItemView被遮住的长度没有超过一半,就取该ItemView作为snapView
              //超过一半,就把下一个ItemView作为snapView
                if (helper.getDecoratedEnd(firstChildView) >= helper.getDecoratedMeasurement(firstChildView) / 2 && helper.getDecoratedEnd(firstChildView) > 0) {
                    return firstChildView;
                } else {
                    return layoutManager.findViewByPosition(firstChildPosition + 1);
                }
            } else {
                return null;
            }
        }
findTargetSnapPosition(): 在触发fling时找到targetSnapPosition。
        @Override
        public int findTargetSnapPosition(RecyclerView.LayoutManager layoutManager, int velocityX,
                                          int velocityY) {
            if (!(layoutManager instanceof RecyclerView.SmoothScroller.ScrollVectorProvider)) {
                return RecyclerView.NO_POSITION;
            }

            final int itemCount = layoutManager.getItemCount();
            if (itemCount == 0) {
                return RecyclerView.NO_POSITION;
            }

            final View currentView = findSnapView(layoutManager);
            if (currentView == null) {
                return RecyclerView.NO_POSITION;
            }

            final int currentPosition = layoutManager.getPosition(currentView);
            if (currentPosition == RecyclerView.NO_POSITION) {
                return RecyclerView.NO_POSITION;
            }

            RecyclerView.SmoothScroller.ScrollVectorProvider vectorProvider =
                    (RecyclerView.SmoothScroller.ScrollVectorProvider) layoutManager;

            PointF vectorForEnd = vectorProvider.computeScrollVectorForPosition(itemCount - 1);
            if (vectorForEnd == null) {
                return RecyclerView.NO_POSITION;
            }

            int deltaJump;
            if (layoutManager.canScrollHorizontally()) {
                deltaJump = estimateNextPositionDiffForFling(layoutManager,
                        getHorizontalHelper(layoutManager), velocityX, 0);
                if (vectorForEnd.x < 0) {
                    deltaJump = -deltaJump;
                }
            } else {
                deltaJump = 0;
            }

            if (deltaJump == 0) {
                return RecyclerView.NO_POSITION;
            }
            int targetPos = currentPosition + deltaJump;
            if (targetPos < 0) {
                targetPos = 0;
            }
            if (targetPos >= itemCount) {
                targetPos = itemCount - 1;
            }
            return targetPos;
        }
这个方法跟LinearSnapHelper的实现基本是一样的。
就这样实现三个抽象方法之后看下效果:

发现基本能像Google Play那样进行对齐左侧边缘。但作为一个有理想有文化有追求的程序员,怎么可以那么容易满足呢?!极致才是最终的目标!没时间解释了,快上车!
目前的效果跟Google Play中的效果主要还有两个差异:
- 滚动速度明显慢于Google Play的横向列表滚动速度,导致滚动起来感觉比较拖沓,看起来不是很干脆的样子。
- Google Play那个横向列表一次滚动的个数最多就是一页的Item个数,而目前的效果滑得比较快时会滚得很远。
其实这两个问题如果你理解了我上面所讲的SnapHelper的原理,解决起来就很容易了。
对于滚动速度偏慢的问题,由于这个fling过程是通过SnapHelper的SmoothScroller控制的,我们在分析创建SmoothScroller对象的时候就提到SmoothScroller的calculateSpeedPerPixel()方法是在定义滚动速度的,那复写SnapHelper的createSnapScroller()方法重新定义一个SmoothScroller不就可以了么?!
    //SnapHelper中该值为100,这里改为40
    private static final float MILLISECONDS_PER_INCH = 40f;
    @Nullable
    protected LinearSmoothScroller createSnapScroller(final RecyclerView.LayoutManager layoutManager) {
        if (!(layoutManager instanceof RecyclerView.SmoothScroller.ScrollVectorProvider)) {
            return null;
        }
        return new LinearSmoothScroller(mRecyclerView.getContext()) {
            @Override
            protected void onTargetFound(View targetView, RecyclerView.State state, Action action) {
                int[] snapDistances = calculateDistanceToFinalSnap(mRecyclerView.getLayoutManager(), targetView);
                final int dx = snapDistances[0];
                final int dy = snapDistances[1];
                final int time = calculateTimeForDeceleration(Math.max(Math.abs(dx), Math.abs(dy)));
                if (time > 0) {
                    action.update(dx, dy, time, mDecelerateInterpolator);
                }
            }

            @Override
            protected float calculateSpeedPerPixel(DisplayMetrics displayMetrics) {
                return MILLISECONDS_PER_INCH / displayMetrics.densityDpi;
            }
        };
    }
可以看到,代码跟SnapHelper里是一模一样的,就只是改了MILLISECONDS_PER_INCH这个数值而已,使得calculateSpeedPerPixel()返回值变小,从而让SmoothScroller的滚动速度更快。
对于一次滚动太多个Item的问题,就需要对他滚动的个数做下限制了。那在哪里对滚动的数量做限制呢?findTargetSnapPosition()方法里! 该方法的作用就是在寻找需要滚动到哪个位置的,不在这里还能在哪里?!直接看代码:
    @Override
    public int findTargetSnapPosition(RecyclerView.LayoutManager layoutManager, int velocityX, int velocityY) {
       ...

        //计算一屏的item数
        int deltaThreshold = layoutManager.getWidth() / getHorizontalHelper(layoutManager).getDecoratedMeasurement(currentView);

        int deltaJump;
        if (layoutManager.canScrollHorizontally()) {
            deltaJump = estimateNextPositionDiffForFling(layoutManager,
                    getHorizontalHelper(layoutManager), velocityX, 0);
          //对估算出来的位置偏移量进行阈值判断,最多只能滚动一屏的Item个数
            if (deltaJump > deltaThreshold) {
                deltaJump = deltaThreshold;
            }
            if (deltaJump < -deltaThreshold) {
                deltaJump = -deltaThreshold;
            }
            if (vectorForEnd.x < 0) {
                deltaJump = -hDeltaJump;
            }
        } else {
            deltaJump = 0;
        }

        ...
    }
可以看到就是对估算出来的位置偏移量做下大小限制而已,就这么简单!
通过这样调整,效果已经跟Google Play基本一样了,我猜Google Play也是这样做的!看效果:
